
How NOT to Build a Wildlife Pond – Mistakes I Made
This is going to be a story of how I tried and failed (at first) to build a wildlife pond.
It started with slugs and snails…
Slugs and snails were eating all my harvest, and I mean ALL of it. I would sow it, and once the little seedlings poked through the ground, the slimy grass mowers would show up and mow every single green seedling they found. I tried copper wire, all sorts of spiky stuff like eggshells and pine cones. The slugs won.
I decided to employ frogs to regulate slugs for me, but frogs live near wet areas, and my garden looks like the Sahara Desert went for a European holiday, so first I needed to build a habitat for frogs.
And yes, I know there are faster ways to get rid of slugs, but I believe in nature being able to take care of stuff itself with a little help.
“Little” was an understatement there. I did not know that before I started digging the pond.
I chose a perfect place for it—in the driest spot of my garden. A spot right under an unproductive grassy slope and on a lawn that struggles. It will reflect the sun and boost the productivity of the nearby trees and shrubs, and add some moisture into the air. Plus, it’s right under the slope, so I’ll make some sort of natural river/waterfall to catch water and send it to the pond when it rains. Great.
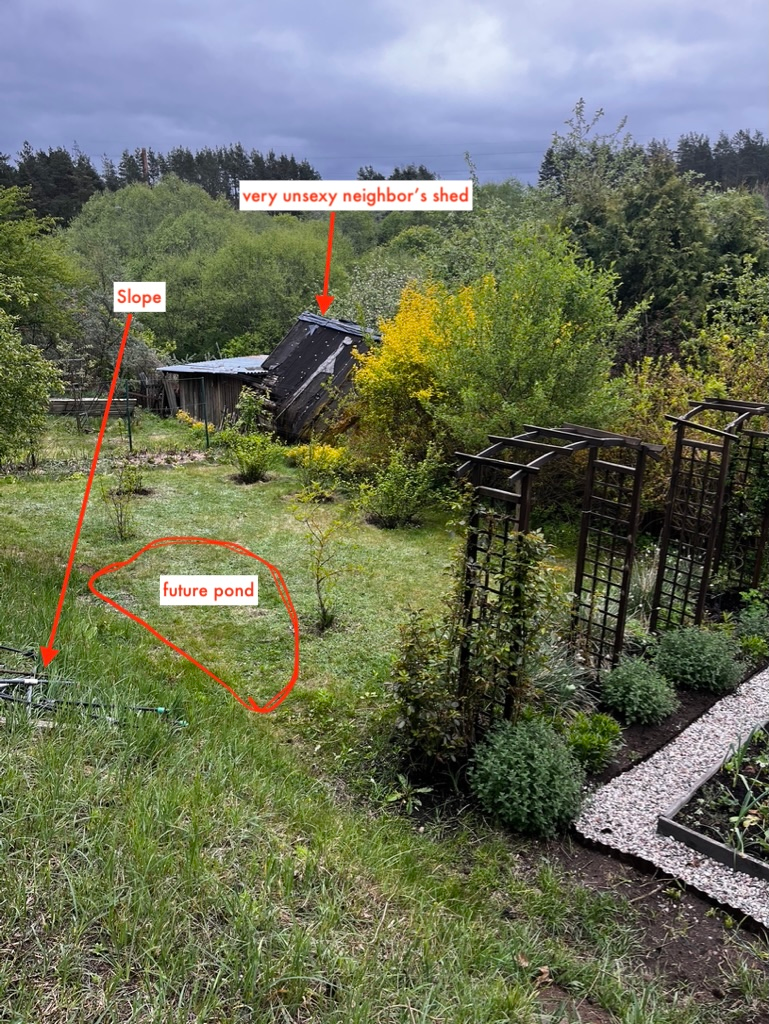
Mistake number 1.
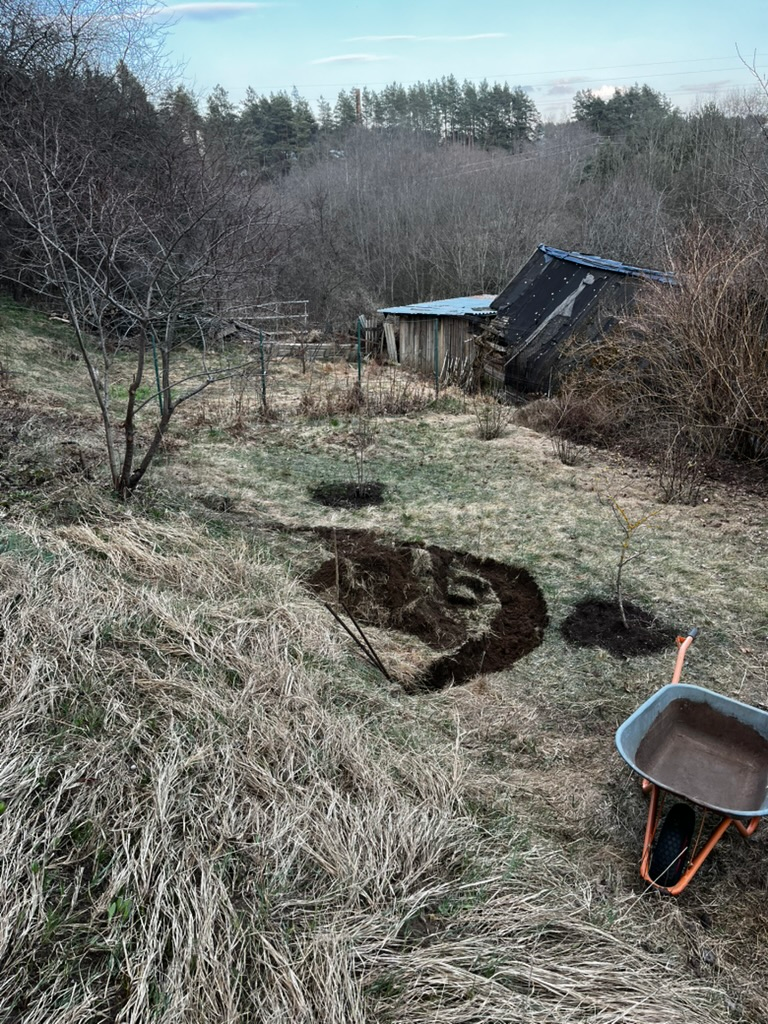
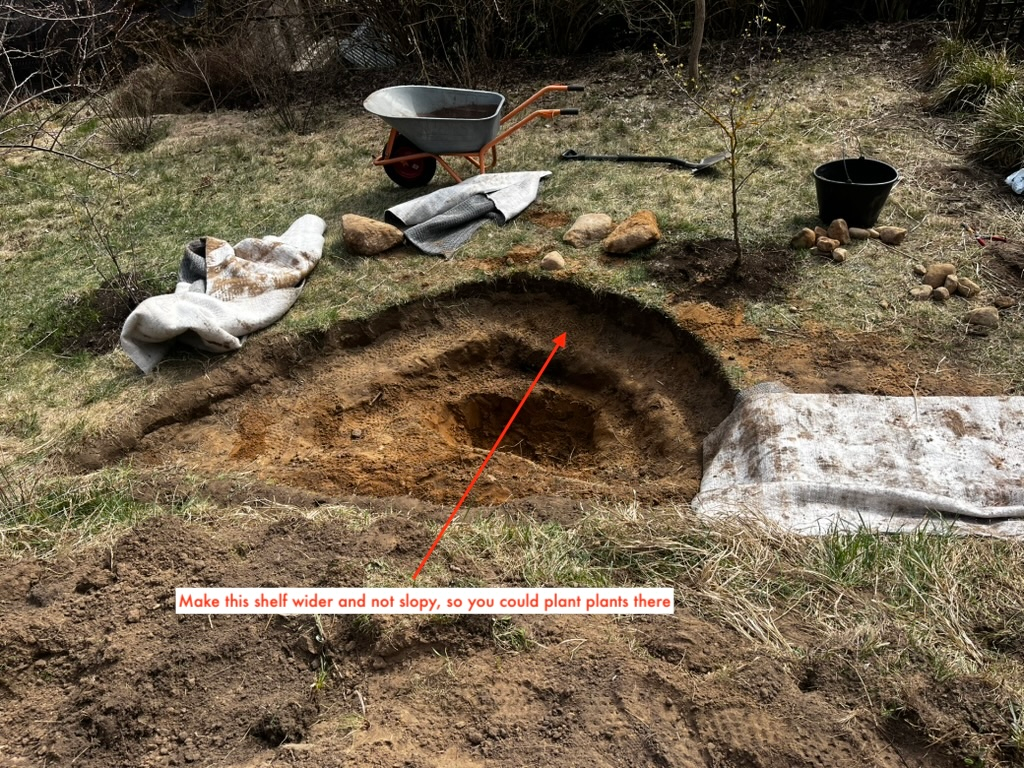
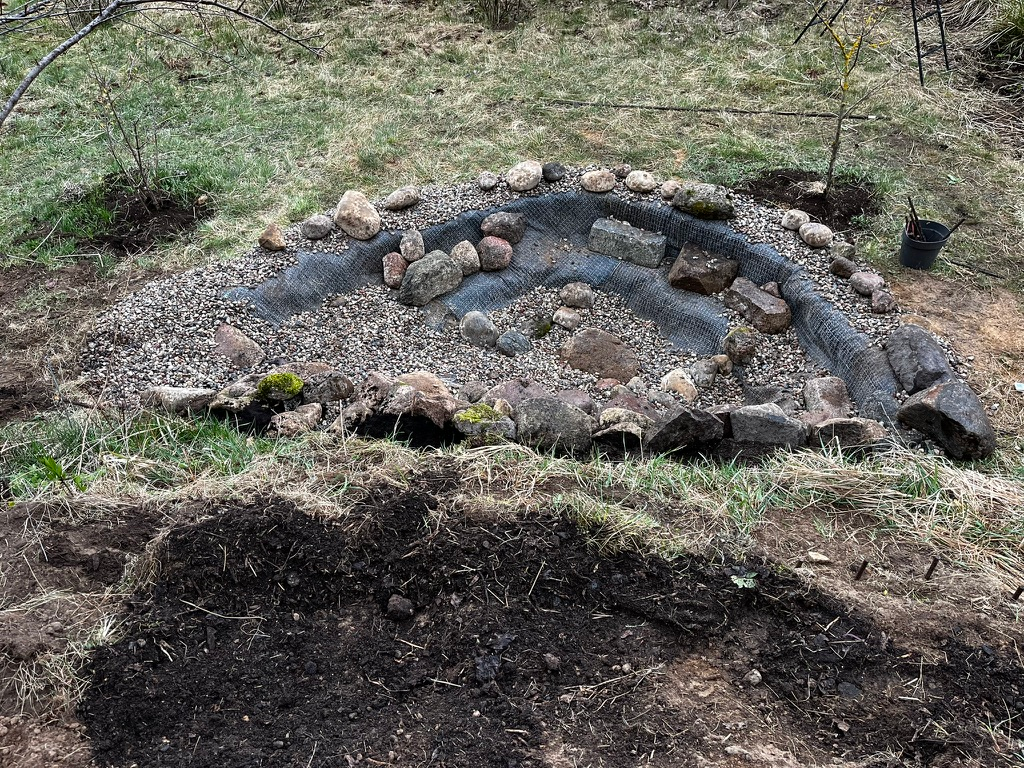
I start digging. I love digging. The more I dig, the more excited I get. I find all sorts of huge rocks there, which I will use around the pond. I remember I have to make a shelf for the plants about 30 cm deep. What I don’t think about is making it wide too. I make it too narrow, and the sand starts to crumble and the edges of the shelf start falling, because what I have there is yellow, nice beach sand. I’m not kidding. Remember the Sahara, right?
So here’s a lesson—when you make your plant shelf, make it wide enough.
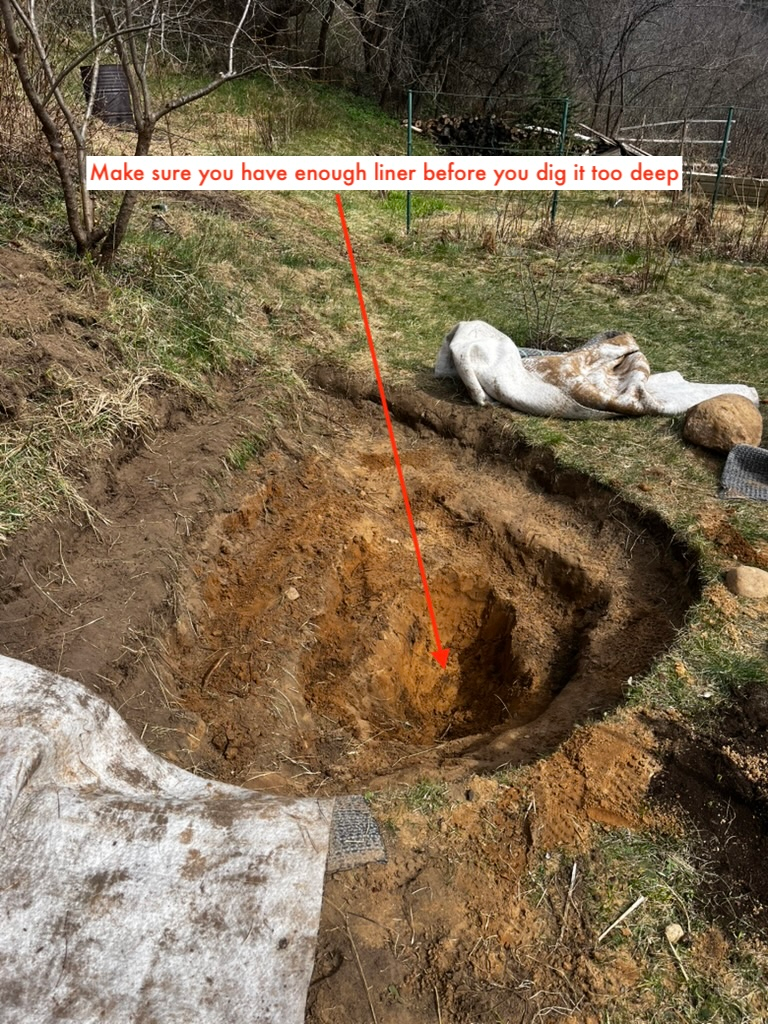
I fix the shelf sort of like one fixes a sandcastle on a beach and continue digging. Somewhere along the way, a thought occurs to me that if I sit, I could almost be fully submerged. It could be a nice ice bath in spring or a refreshing dip in the summer! Wouldn’t that be great? With that genius thought, I keep digging myself to mistake number 2.
Mistake number 2.
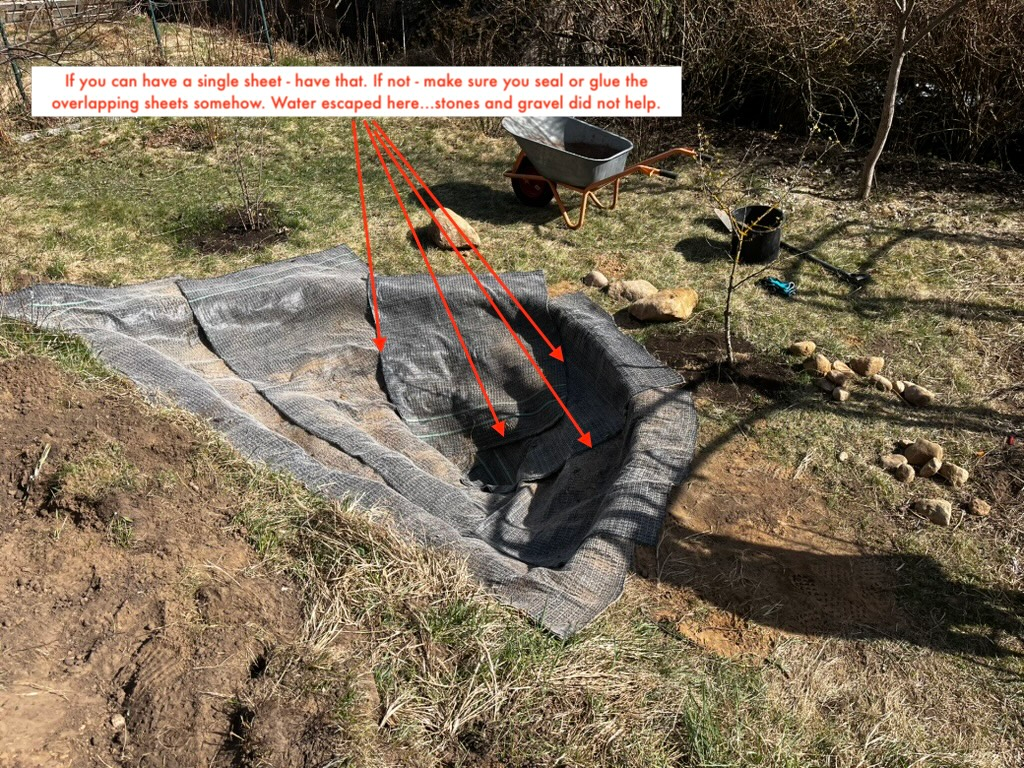
Now, what’s a natural way to make a pond? I didn’t want to use a plastic liner. I saw people slapping bentonite clay all over the pond bowl. When bentonite is wet, it expands and prevents water from escaping. I googled. There is no bentonite clay where I live, but there is something called Voltex rolls used in construction. I have no idea what they look like; the photo is not super clear. I write to the shop, explain my idea, and they say it could work.
My pond will be 3 meters wide, 5 meters long, and about 1 meter deep at the very center. They have rolls 10 × 5 m or 5 × 1.5 m. One of those small rolls weighs 35 kg; the big one is twice the weight. I don’t think I’ll be able to lift the big one. I ask if I can layer them on top of each other without losing water. The man says I need to cover them with rocks or sand or something to “weigh them down” so water doesn’t escape. Ok. I bought two smaller ones.
The day they are delivered, I’m not at home, and I receive a message from the guy who lives in my house temporarily:
“They delivered your carpets. Should I just leave them outside?”
Carpets? Oh no. But ok, let’s see them when I get back.
I get back and realise that my idea of having a more natural, ecological pond has not just failed, but will probably become an even more unnatural pond than a simple PVC-lined one. The “carpet” is bentonite clay sandwiched between a soft, thick textile on one side and that woven plastic on the other… you know, that crap that has a thousand little plastic strips? Yep.
Oh well, they’re here already… might as well use them.
I drag them to my pond, barely, huffing and puffing and straining every muscle in my body. They weigh more than half my weight.
I unroll them and lay them out and…
My genius thought of making a nice dipping place was too far-fetched. The liner is not enough. I dug too deep. Ok, maybe I don’t need a dipping place. I pour some sand back and cut one of the liners to cover the last uncovered bit. I overlap the rolls generously and put heavy rocks on top, just like that man in the shop said, then haul buckets of gravel.
Mistake number 3.
It takes me 3 days to haul heavy rocks and gravel until the pond is finally ready. My back hurts. I drag the hose in. It’s not a simple task since I don’t have water in my garden, so I have to join two of those 30-meter hoses to reach the farthest part of my garden.
I open the water. The pond fills. My heart fills with joy. It seems okay. While I tidy up, I notice that the level seems to have dropped by a couple of millimeters, but I reason that the clay must be soaking some in, so hopefully it’s ok. Somewhere deep inside, I suspect it’s not ok.
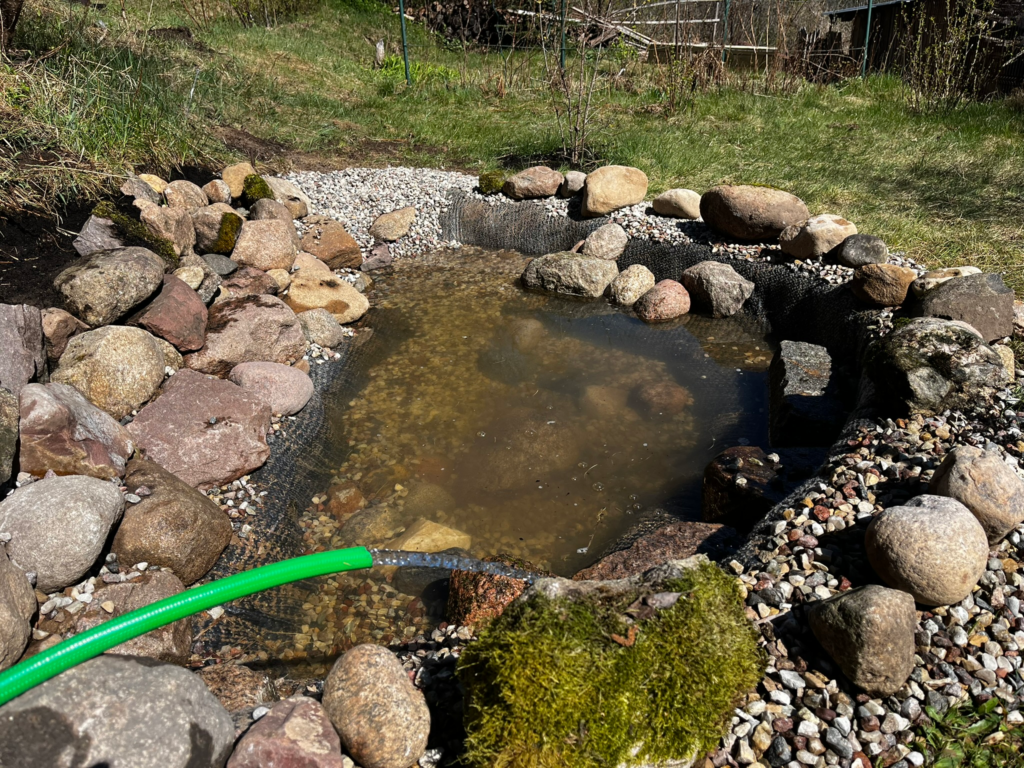
I leave and decide to come back in 2 hours.
In 2 hours, it’s clear the water is down by at least 1 cm. In another 2, it’s 2 cm. In a week, the whole pond slowly seeps away. My suspicions are confirmed. Sadly.
The thing is, the rolls do hold water—I made a test—but I should have bought the big one and laid just one continuous sheet. The water is escaping between the sheets, even with a generous overlap and rocks on top.
But actually, I should not have tried to reinvent the art of pond-making and should have just used a normal EPDM liner.
It’s more expensive, but it’s not as heavy, it’s durable, and it doesn’t leach plastic or any harmful substances into the water, so your plants and aquatic life stay healthy. And there’s some important worm-related discovery I explain later on.
There’s also the cheapest PVC option, but with winters being pretty rough, I didn’t think it would survive long, and then you’ve got a lot of useless plastic.
Rebuilding the Wildlife Pond
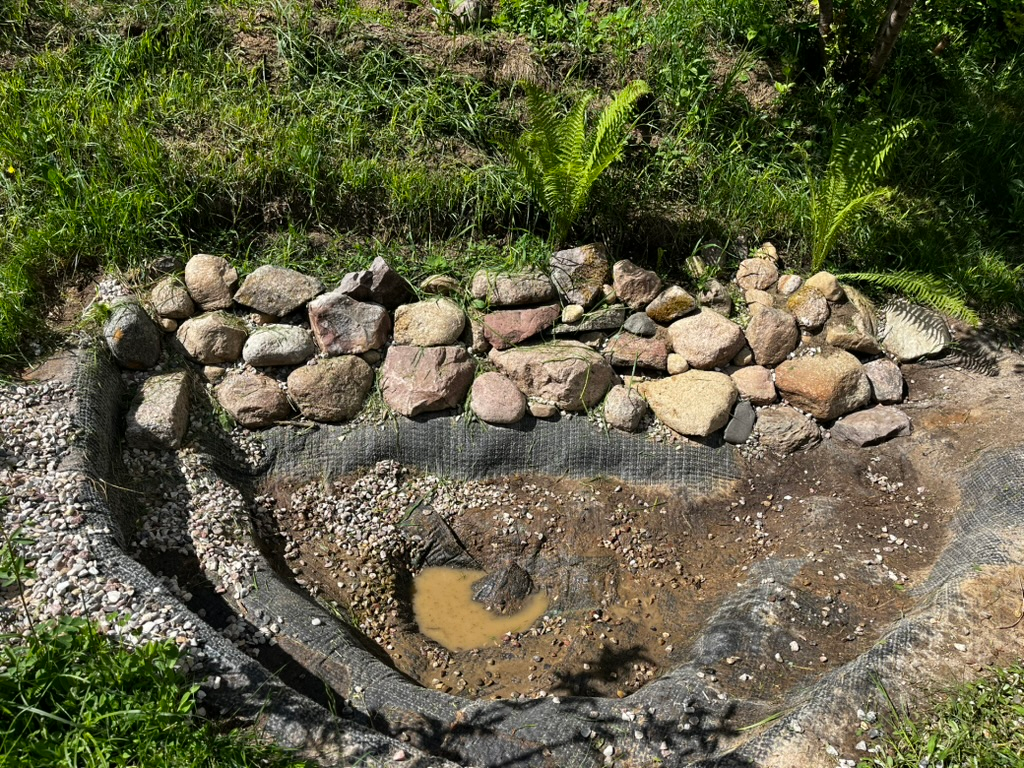
I bought the EPDM liner. Now I had to scoop all the gravel out and take all the boulders out of the pond. That took a while. Some of those boulders weigh about 20 kg, so needless to say, my back was not happy… again… and my arthritic joints swelled on me, but hey, that’s the price you pay for having autoimmune diseases and refusing to play by their rules.
The first day, I was just moving rocks, cleaning the Voltex lining with a brush, making sure there was nothing sharp left, lining it with EPDM (on top of Voltex), and putting the big boulders back on.

One thing to think about on the topic of textiles. I took at least 5 worms out of the traps of the Voltex rolls. They seemed to get stuck in the tiny textile weave. So it got me thinking: when people line geotextile on top of EPDM (to protect EPDM from punctures), do they accidentally kill a lot of worms? I felt so bad for those poor things. I didn’t put geotextile on top of EPDM. I thought it was fairly strong and didn’t feel like it was worth the worm lives.
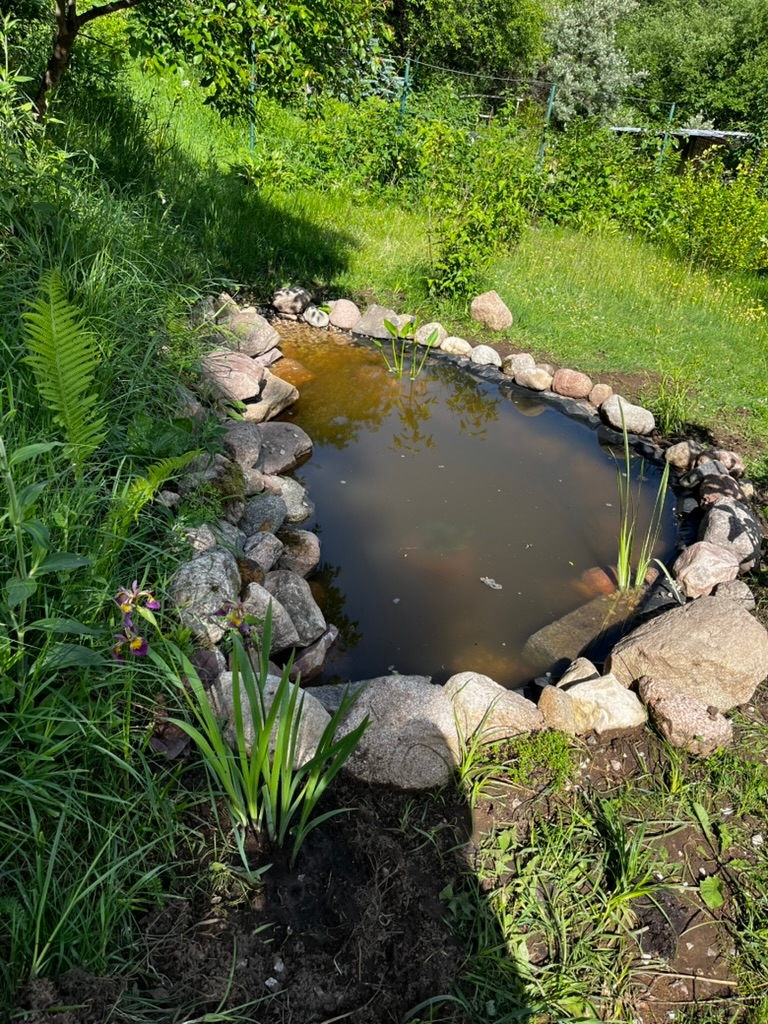
The second day, I placed the gravel back in the pond, filled it with water, made a tiny berm along the edge, and dug the liner under the ground right behind the berm. I then placed the remaining stones around the edge.
I still need more flat boulders—some to put inside and some to cover the visible liner on the edge.
I planted some plants—an Iris versicolor, Pontederia cordata, Acorus calamus ‘Variegata’, Carex muskingumensis, and a ‘Little Sue’ dwarf lily—as well as some fern, plantain leaves, creeping thyme, and creeping Jenny on the back wall.
The pond is there. The water is there.
Frogs—I’m ready for you!
Lessons learned:
Lesson 1.
Before you dig, make a plan. Make sure you have a WIDE shelf about 30 cm deep for planting aquatic plants. The rest can either slope gently or have further steps. Make at least one end of your pond a shallow slope, so animals and insects can safely drink water.
What I realised is that if you make “steps” all the way to the deepest center, depending on how clear the water is, you might see the edges of the liner (or have to use boulders to hide it, because gravel will lie on top, but the vertical wall will be bare). Gravel will hold well on a gentle slope. This way, you’ll have to use fewer big boulders.
Lesson 2.
When you dig, make sure the edges of the pond are level. It seems like something very obvious, so no one mentions it, but my pond was on a slight slope and I kept telling myself not to forget it, but I did and was reminded of it by my aunt, who looked at it from the side and was like, “Will the water not spill over the edge?” Yes, it would. I had to lower the other edges so it wouldn’t. Just use a long straight stick (a broomstick?), lay it from one edge across to another, and put a level on it. Tip—your iPhone has a level in the Measure app.
Lesson 3.
If your pond is not a typical shape that’s easy to calculate and you don’t have a budget for a lot of extra liner, when you dig it, use any fabric you have, like geotextile or a simple sheet. Line it, take it out, and measure it to see how much liner you need. Don’t forget to add about 30–50 cm on the edges for anchoring.
Do not reinvent the wheel… just use the EPDM liner. It’s stretchy and durable (pretty thick too). You can use the cheaper PVC plastic, but if your winters are harsh, it could crack.
Lesson 4.
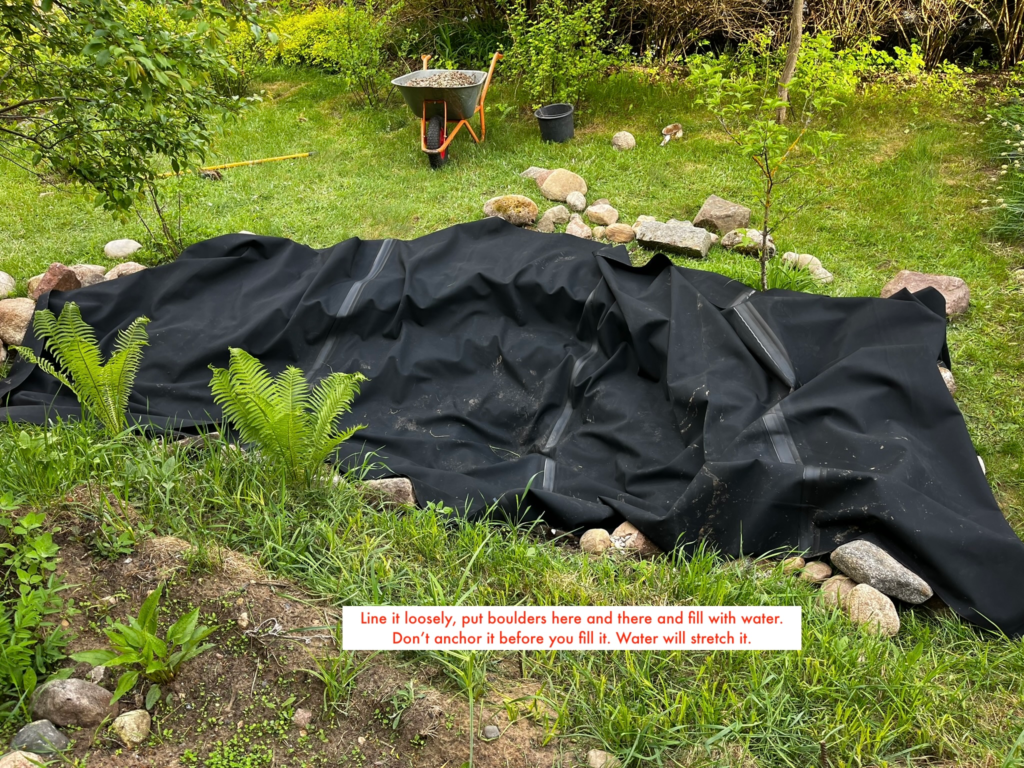
When you install the liner, do not anchor it before you fill the pond with water. Lay it loosely and make neat folds. Water is heavy, and as the pond fills, it will press the liner into every crack and contour of the pond.
To prevent the liner from stretching or tearing, leave at least one side unanchored while filling. This allows the liner to slide into place as the weight of the water pulls it down.
Lesson 5.
Gravel—if you can and have the budget for it—use river stones. They are round and less likely to puncture your lining if you step on them. Mine is something similar to mixed quarry gravel, but I’m intending to use the boulders if I need to step into the pond, so hopefully that’s ok.
Lesson 6.
When you anchor the liner and dig it into the ground, try to do it as close to the pond edge as possible. Dig down rather than far away from the edge. The reason is that if you want to plant things around the pond, their roots will eventually hit the liner. Giving them a bit more soil between the plant and the liner will make their lives easier.
Lesson 7.
Protect your back when hauling boulders. Sounds like something your mom would say? Well, you’d better listen.
I hope you have found this blog post useful, if not a bit painful. If you ever decide to build a wildlife pond, whether in hopes of attracting frogs or just making your garden a little more diverse by adding some water wildlife – you’ll at least know what not to do!